There are no two ears shaped exactly alike, and also there are few hearing health care professionals who take an ear impression using exactly the same technique. The following is an outline of just one correct way of obtaining a complete, accurate impression.
Click the image above to expand it to full size
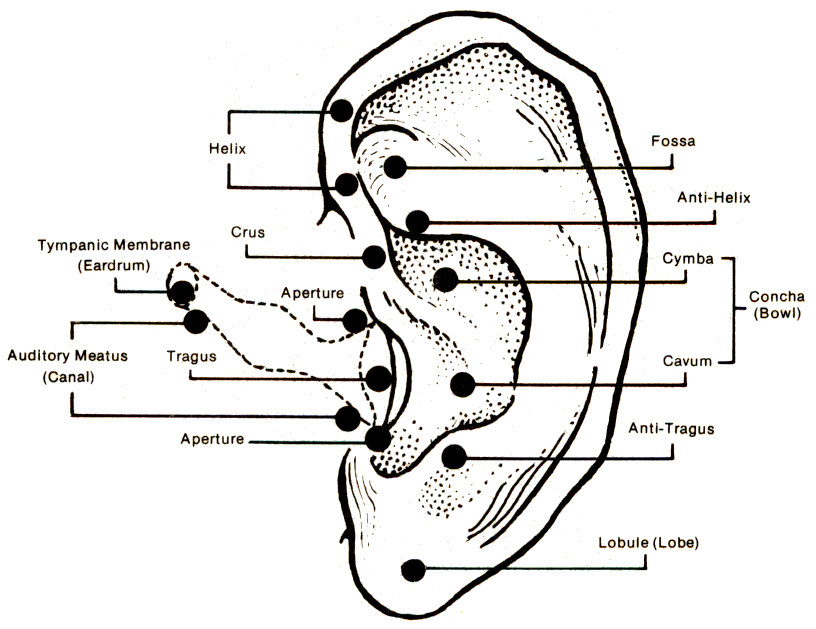
Before attempting to take an impression, you should know the basic anatomy of the ear. Explain to your subject what you are going to do and why and be sure that the individual is at ease and comfortable prior to starting the procedure. Under no circumstances do you want the subject to be tense.
The ear canal should be carefully examined with an otoscope. If the canal shows signs of infection, discharge, or unusual amounts of wax build up do not take the impression. The individual should be referred directly to a physician. If the ear canal is clean and unobstructed, you may proceed.
Insert a cotton dam or foam block of sufficient size to properly occlude the canal. It must be slightly smaller than the opening at the primary seal in order to travel down the canal, usually past the second bend. The block must not be so small as to allow impression material to be pushed past it, which would usually result in an underfilled and distorted impression. Please ensure that when using foam blocks, they sit parallel to the opening of the canal; if they are twisted, it may reduce the amount of useable canal length. Pull the concha of the ear gently out and up, away from the head. This will open the canal aperture so that you may insert the block approximately 1.5 - 2.0 cm. down the canal using the tip of your earlite.
You may now prepare the impression material following the exact instructions on the package. Whether you use silicone or a monomer/methacrylate combination such as Audalin, be sure to mix the materials accurately and well. If using a monomer/methacrylate, always add powder to the liquid. Load the syringe fully and squeeze the material slightly out of the tip until the air has been ejected. Be prompt at this stage of the procedure in order to prevent the material from setting up before it has been properly injected into the ear.
Place the tip of the syringe into the ear canal and begin pushing in the plunger. As the canal fills, the syringe is withdrawn slowly, backing it out against the pressure of the material. The tip of the syringe is kept in the concha with continuing pressure until the bowl is filled and the tip is then moved up into the helix. Be sure to fill this area completely, as well. You may lightly press the area on the outer part of the helix in order to bring it back to its original shape. At this point, the entire concha should be full, with the material overfilling the entire ear. No gaps should be visible at the tragus, the bridge area, or the rear of the concha. Allow the impression to set in the ear for at least the time recommended by the manufacturer, or until you cannot indent the impression with your fingernail.
When removing the impression, loosen the material from around the outer ear. FROM THE BOTTOM, pull the impression gently up and SLOWLY out of the ear and canal. The impression and block will come out in one piece. Do not remove the block from the material.
Examine the impression carefully. If any voids are visible, or if the canal length is insufficient for your clients needs, take a new impression to correct the problem immediately. As a general rule, the best length to strive for is just past the second bend. If hair in the ear distorts the impression, the hair should be clipped carefully with either an inexpensive rotary trimmer, or a pair of double-sharp scissors. A poor impression will result in a poor earmold, as our technicians can only duplicate what you have sent us. The time you save by taking a good impression the first time will probably be your own.